Saturday, March 26, 2011

Microsoft Word Tutorial

Everything in this article pertains to the Microsoft Office Word 2007 version. These instructions will vary for older versions.


Microsoft Office Word is a word processor that is widely used in homes, schools, and offices to create and edit documents. This is a basic tutorial for first time users of the program. Word isn't free. If you are looking to purchase a free word processor linux comes with Openoffice or you can go to openoffice.org.

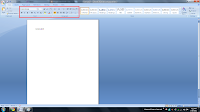
When you first run Microsoft Office Word you will be confronted with something that looks like this. When you type with your keyboard the letter you hit will appear in the word displaying pane. If a word is misspelled it will be underlined with a red squiggling line. Right clicking the line will bring up a menu of suggested words, the ability to look the word up, ignore the error, or adding it to the dictionary. When you add it to the dictionary it will never tell you that word is misspelled again (Useful for unrecognized names). 

At the bottom left you will see a book and Word Count. Word count shows how many words you have saved in the document. The book will indicate a variety of things. If there is a red X over it then you misspelled something or used incorrect grammar. Clicking it will take you right to the word. If there is a blue check then it means your spelling and grammar checks out. The green line is a grammar line. It mainly appears when you right Sentence fragments. (Example: Sell did the.)
Now it is time to learn some keyboard shortcuts. Over on the left side of the keyboard you should see a tab button. Hitting that will indent in the word document. Highlighting something and hitting Ctrl+C simultaneously will put it on the copy clipboard. The clipboard is a place where you can "copy" text to to "paste" it somewhere else later. To paste hold ctrl and hit V. This doesn't only apply to Microsoft Word. You can copy paste from anywhere and put it here, and vise versa.

Holding ctrl and hitting S is the shortcut to save the document. It is always a good idea to save even if document recovery has your back. There's nothing worse than losing hours of hard work. Be sure to Save AS something before saving. Saving as will give your document a title and tell you the directory from which you can access it. By default this should be your "My documents" directory. My Documents can be accessed from the start or Windows buttons and the "Documents" option on the right side. You have the ability to create, folders, and subfolders, (to infinity) in this directory. This way you can arrange things by category. (Example: School, Work, Novel, Account information.) You can return later by clicking the link to where you saved it from or opening it right from word with CTRL+O

         Now let's examine the first two boxes at the top portion of the screen. The first box is font and everything in it is pretty much self explanatory. You can change the font size to a higher level  (making it larger) or a lower level (making it smaller), Change font color, and change subscripts, highlight coloring, and extra text effects from here. Hovering over a button will tell you what it does. The second box is the paragraph box. From here you can change text alignment / justification, Make lists, alphabetize, and shade in the backround color.

The styles bar can be used for special occasions such as titling. Hover over a title box with highlighted text to see what it does.

What you should understand is that all of the things you have learned thus far are contained in the home tab. There are 7 tabs that you need to experiment with. Insert will be your next big one to learn about. From the insert tab you can input premade shapes, pictures, or custom designs built from a drawing pane. This is also the place to make charts, word art, blank pages, and hyperlinks. The insert tab will be included in a future tutorial of Microsoft Office word comes out. 

Tutorials are released on a weakly basis the closest to Thursday that I can get. Stop back in on one of those days to see if a new Microsoft Word tutorial has shown up. 

Friday, March 18, 2011

Email service comparison

As you probably know email is a service that allows you to send text and files of various formats to a recipient that also has an email address. There are a few services around and each of them offers some unique bonuses. In this post I will compare the three major email providers that I have experience with.

Hotmail email - Hotmail email is a free service provided by Windows. Creating a hotmail account will create a Windows live ID, which can offer a wide range of services (which will be talked about later). Hotmail offers a secure HTTPS login through the Microsoft cooperation. That probably doesn't mean much to you.) The hotmail inbox will show you all the unread or read messages that you have. There will be a checkbox where you can mark messages as junk (unsafe sender), delete (deletes it), Mark as - Unread, flagged, unflagged, move to (Move to a folder), and phishing scam (Trying to reveal information about you for profit.). You can create folders, which are areas where you can drag emails to categorize them. For example you could have Work, school, social, and family folders. You can attach a file to an email to deliver it in it's current form to a recipient. The Hotmail attachment system isn't the most secure out of the three, but upload speeds are quick for all attachments. Hotmail's spam protection works well for most things but lets more spam by than Yahoo! or Gmail.

Yahoo! email - Yahoo email is provided by the search engine based company Yahoo!. When you create a Yahoo! account you unlock a wide range of services provided by Yahoo. Two notable services are the Yahoo! email (which I'll get to in a minute) and Yahoo! answers. Yahoo! answers is a place where you can ask questions and have them answered by other users of the service. They established a point system to keep the asked / answered ratio in balance. You need to answer 3 questions before you can ask one (roughly). The actual Yahoo! mailing service is very similar to Hotmail's. You are able to access the Yahoo! messenger directly from your inbox. Messages can be arranged in folders like the Hotmail service. The Yahoo! Spam detection is a lot more accurate than hotmail's but it sometimes leaves non-spam messages in the spam folder. They are easy to remove but to access them you have to dig threw the wall of spam that will probably be calling the spam folder it's home. Be sure to clear it out often. You can also attach files with this email. All attachments are scanned with Norton Antivirus on the sending and receiving ends to make doubly sure that the attachment isn't some form of malaware. Linux 64-bit users will be forced to use Yahoo! mail classic with a GUI much less pleasing than the most up-to-date one. Yahoo! doesn't use a secure HTTPS connection.

Google's G-mail - Gmail takes a few of the services from the two I mentioned earlier and then provides some original Google services. To create a Gmail account you will need a Google account. This is one of the few email accounts that requires a phonecall or text verification to create. There's pretty much no getting around this. After you type the confirmation code it (it will be similar to an audio Captcha challenge) your G-mail will be created Automatically. What you currently see is a Canvas inbox. There are few (if any) emails in it and it has no applied themes. Gmail offers the ability to add visual themes to the inbox. G-mail also has a calendar that can send alerts to your desktop if there is an event coming up. Instead of folders Google has what are called Labels (similar to Blogger labels) that can be searched. More than one label can be applied to an email.For the first time out of any email service G-mail also allows you view your inbox offline. (Going by the last saved "draft" of your inbox.) You get 7564 MB of storage. This is a LOT of space and emails take up very little. To help you take up the free space on your Google memory you can store some files here. You will need to download this Drive Shell extension first. Then download the .zip file and extract it in any folder on your computer. Run the setup file and put in your Google account information. The G-mail drive should now appear under the "Other" section of your computer tab. (The place that displays your memory for backup, OS, and removable File system on Windows computers.)

Conclusion
I have always been a Google supporter. I do not have a biased opinion though. I always choose the service that provides the best products. This time Google wins again with the G-mail service. The offline inbox availability is a major breakthrough for anyone with a flaky internet connection. The label to email linking is also a convenient feature for finding mail later on. Lastly, the ability to add 7564 MB of storage to your system for free is what really puts the G-mail service above the rest. To give you an idea of how large 7,564 MB is my 2,000 pictures only take up 365 MB of space. I would be able to save all of these on my Google drive and still have 7,200 MB left. I could save all of my 2,000 pictures about 20 times before I ran out of room. That is 40,000 high-quality pictures that could be saved online for free.

Non related information
be sure to check out the newly updated D.O.W operations page. The war for internet anonymity has begun (see the bottom.)

Thursday, March 17, 2011

Chrome tutorial 2 - Left out information and Chrome anonymity.

This is some random information I left out in my first tutorial of Google Chrome.
To start a new tab (A window that is opened within your current browsing screen) you can do one of three things. The first thing you can do is click on a link and hit "Open in new tab". Secondly (The most common way) you can click the plus sign near your currently opened tab(s). Like internet explorer the keyboard function Ctrl+T still works for opening new  tabs by default. Tabs are useful to use when you want to view another page without leaving your current one.

Something else I left out is the ability to drag a tab to create a new window with that tab in it. Click a tab with your mouse, click it, and drag it away from the tabs pane. It will automatically open a new browsing window with just that tab in it.

If you right click a tab you will also be given the opportunity to pin the tab. When you do this the tab will shrink to just the website's logo. (Like the blogger symbol for this blog.)

Inspect Element
If you right click on most places of a web page you will get a few options. "Paste, Spell Checker, and Open in new tab" will be there depending on where you are right clicking. Another option that will always be there (unless you are clicking on Flash driven services) is "Inspect element". When you click this it opens the HTML script for the web page in a new Google chrome Window titled "Developer Tools". I am not experienced yet with major HTML editing but I will show you what I know so you can alter website images or text for use in humorous screenshots or faking something. Right click this sentence. You will probably see something along the lines of > <p>...<p>. By clicking the gray > you see by the <p> it will display the text inside. Now you should see this entire post inside the <br> confines. If you double click any of the text you can edit it to whatever you want. Note that the changes will only appear on your computer and are not permanent.

Now try doing this with a sample image like this one. You should see something that looks like a URL already highlighted with the text "src=" in front of it. Double click that and move the cursor over with the arrow keys to change it. Find the URL of another image you want to use (images from Google images or facebook all work) and replace the URL with the URL of your image. If you don't keep the "SRC=" it won't properly work.

Inspect element can be used to create false items or alter existing ones on a website. So if you were chatting with one of your friends on the internet you could alter the image URL and the name / text your friend was giving you to make it look like you were talking to a celebrity. This was done in Youtube's Life In a Tent attempt to impersonate Boxxy and make it look like her "new" video was a fake.

Anonymity in Google Chrome
Google Chrome comes with what is called Incognito mode. This won't store any cookie information about you. This does nothing to alter your IP address or stop you from directly downloading something, though. You can see how to configure a tor or web proxy with Google chrome in my earlier article "Anonymity on the Internet: Harder than you think". Accusations have been made against Google saying that it invades your privacy. These are mostly untrue. The only reason Google does this is for trying to improve their services for their clients.

Wednesday, March 16, 2011

Google chrome user guide - The basics

SofDue to real-life requests I am going to write an extremely simple tutorial for Google chrome (see earlier posts for what exactly it is.) Your first step is to download Google Chrome. If you are using linux or another 64-bit browser this page will automatically detect it. After the download you will automatically be asked what your default search engine should be. Choose the engine that you are the most comfortable with. You should also set Chrome as your default web browser.

After the initial setup is complete it will throw you directly into the New tab window of google chrome. If you see something that is similar to that image you have done everything right thus far. You will only have 2 recently visited websites. One is for a Chrome tutorial, one is for Google chrome themes. Themes are designed to change the color / pattern schemes of the download bar, the browsing header, and the new tab pages.

Immediately after setup you can start using Google Chrome. You can just click the URL field and type the name of the address that you want to navigate to. The Google Chrome URL field also serves the searching purpose. You can type a phrase or question into the URL field and hit enter and it should take you directly to the default search engine's search page for that word of phrase. If you would rather search a site (Youtube will be our example) you will type the name of the website followed by what your search should be. So if you wanted to search Youtube videos for Rivers you would type "www.youtube.com Rivers" in your URL pane.

You might not want to start browsing just yet though. You may realize that your beloved toolbars have gone missing. This is because Google chrome uses Extensions rather than toolbars. Extensions can affect the way that certain services behave or modify the GUI or browsing interface you use to interact with the internet. (Here is where you download them.) Some of the more famous ones are already listed on the front of the extensions page. Some more useful ones I've found are Wikipedia, and Kick Ass for a graphical way of removing page elements.) If you click install on an extension page you will be asked to confirm under the given privacy regulations provided to you.

I mentioned page elements earlier. That refers to the html script that most websites use to display information. Google Chrome comes with a built in feature called "Inspect element" (similar to Firebug on Firefox). I will teach you more about this later.

Once you have all of your extensions set up nicely  the next thing you want to do is set up your bookmarks. In the Google Chrome window on the URL field there is a grayed out star on the far right hand end of the bar. If you click this you will be prompted to give a name and a folder to save the bookmark in. The bookmark bar will be your default bookmarking place. This is the bar along the top of the new tab page that displays webpages you've bookmarked for quick navigation. Keep websites you use often here for ease of access later on.

For Linux 64-bit users
Google does have a version of Chrome for you. I experienced some problems involving Flash but they can be fixed. I would gladly tell you how to fix these issues but I am not really sure what I did. After 2 days of downloading from the Ubuntu software center and Adobe everything straightened up.

In the next tutorial
The basics of HTML will be discussed and more network connection / proxy configuration guides will be input.

Sunday, March 13, 2011

Windows cmd lesson 1 - The basics

Cmd, or command prompt, is the shell of the Windows Operating system. It is here where you can tell your computer to execute commands in the simplest way possible; text commands. There's no fancy user interface to tell it what to do. Just a black screen with white text.

 To run cmd on Windows 7 type "cmd" into the search box and hit enter. It will run automatically. On earlier versions of windows you will have to use Run and then type cmd+enter. You will be greeted with C:/Users/user: | This is where you can tell cmd what actions you want done. If you are not happy with the color setup you can type COLOR (Numbers 1-100 or letters) to change the color. Color 3 and Color a are both greens. Color A than color 3.
Once you have your color scheme arranged it is time to tell it to start doing commands. You could start off simple by finding out your IP address with Ipconfig. Another useful command is Tracert followed by an IP address or a URL. This will show how many hops (steps) it takes to reach a destination on the web from your current location. This will count for a maximum of 30 hops unless you type -h (number) after the tracert commands. This will tell cmd exactly how many hops you want to set as a maximum. -w  (number) will tell it how long to wait before it considers the connection "time out" or lost. If you have a slow connection speed this will be your best bet.

The next and most widely used command on cmd is
Ping. By default Ping sends a request for 32 bytes of data to a server and waits for it to send the 32 bytes back. It will do this a default of 4 times before telling you your highest, average, and lowest connection speed in milliseconds. This is a good tool for testing internet connection speed against a server or to see if an internet connection problem originated from your connection or your website. Another (illegal) use for this is attacking a website with massive ping requests in an attempt to slow it down. This can be done using the commands -t (makes the ping process go until it is interrupted) and -l (number of bytes after -l). The higher the number of bytes the higher amount of work the server has to do. There is a cap of 64,000 bytes, but most computers can't handle that with the default timeout time. Once again, typing -w (time) will allow you to reset that amount.
The last commands are Cls and Title. CLS just clears the cmd screen from all previous text. Title (followed by text) is what the name of the cmd window will be. So for instance if you wrote Title The legionnaire's den. the title of the cmd window would change from cmd.exe to "The Legionnaire's Den.". 

Friday, March 11, 2011

Operating System comparison

As you have seen in some of my pictures I use Windows 7 home premium as my operating system. I had been hearing about an operating system called linux and I thought it was just one system rather than a whole array of them. The first result on a google search revealed Ubuntu 64-bit OS.
The Installation
 I decided to download that and dual boot it with Windows 7. That process was incredibly easy. Just use the windows installer shown on the downloading page of Ubuntu. Once the 4-5GB download is complete (it took several hours for my 690 kb/s connection speed) you will need to finish installing and restart. Now you will see an option as soon as you start your computer to either use Windows or Ubuntu. You might want to use Windows to transfer necessary things over.
Once you're in Ubuntu
The first thing you should do in Ubuntu is set up your internet connection and set up what internet browsers you want to use. I recommend downloading screenlets, because it works just like Rainmeter. Now download all of the updates for Ubuntu and transfer anything you want from Windows over to Linux. You should also download a program called Wine for running Windows Programs of which there is no linux equivalent. Linux cannot run .exes. Because of this it is incredibly secure and hard to catch a virus on.
How to customize Linux
Use your Ubuntu software center in Applications > Software Center to hunt down any software you want. Some are installed already by default and are designated by a green check in the software menu. You can add your messengers and emails to the options in the top right corner of your screen.

Analysis
So far it seems that Ubuntu linux is a very user friendly OS and is very secure, reliable, and customizable. It also offers a wider range of tools for coding / scripting. However many programs highly popularized by Windows can be run in Ubuntu due to its incapability to run executables. If the programs is pretty well known Wine, which I mentioned earlier, should be able to solve the problem. The ability to have workstations in Ubuntu is also an a very big plus. It has really helped with my clutter of windows that I experienced in the Windows OS. So my conclusion would be that Linux is pretty much superior to Windows in every way that I could see possible. I would definitely recommend downloading this free OS instead of paying for a Windows upgrade.